Tuesday, May 31, 2011

Tumbler Quilt Top

I managed to make a little progress with the little guys tumbler quilt top today. I had tried a few different layouts but I really liked the repeating pattern that I finally came up with (they aren't sewed together just laid out for designing purposes).  Its a little smaller than I was planning on but it still should be big enough to lay out and have the little guy hang out on and be comfy.

One day I'd love to make a bigger quilt with a ton of different fabrics but I think thats something that would work better with a twin or bigger sized quilt.  Until then I'll keep rocking this quilt out and get it onto the finished list!!


I still have to cut the bright yellow as the boarder tumblers (to go all the way around) and then I'll bind it with the bright green to add a bit of pop.  Hopefully I can get to the boarder fabric tomorrow and start sewing it all together after that.  

I need to come up with a name for this blanket - rather than Boy Quilt #1!  I'm thinking maybe Tumbling Dots?  

Monday, May 30, 2011

Baby Boy Quilt Designing

Wow - its been a bit since I've posted here, sorry about that!  Between being sick for a bit last week and life getting in the way I've been a little lax in my Blogging.  I have however finally decided on what to do for a quilt for our little boy that is due in August - a flannel Tumbler quilt using my Accuquilt GO cutter.  I'm still trying to find 'the quilt' to make for him but I can't decide on fabrics or the style of quilt I want to make so I'm going to make this Tumbler quilt as a start I've got something on the go for him at least!!!  I really want to make a log cabin quilt but any time I think of trying to pick out THAT many fabrics it makes my head hurt so I guess I'm not ready for one of those yet!

My SIL picked up most of this fabric when she was in Lethbridge a few weeks ago and I've been trying to figure out what I could do with it for the little guy since I don't want to waste such awesome fabric on something just because....  Then it hit me - TUMBLERS!!!  One of the biggest things that drew me to the Accuquilt was the big Tumbler die and now I have a sweet little project to try it out on!


I'm thinking I'm going to use the 5 fat quarters in the middle as the main body of the quilt (no its not going to be very big!!!) and I figure I can get 6 Tumblers from each fat quarter = 30 Tumblers.


I think the yellow fabric on the bottom will be a filler fabric and I'll just a few extra tumblers cut from that fabric to fill the space in between the fat quarter tumbler squares.  I think I'll need between 6-10 of these yellow tumblers.


Finally I'm thinking I'll use the green fabric on the left to edge the entire top of the quilt for two reasons - to make it bigger and to help make it a little more cohesive.  I may have to go out and get one or two more fat quarters or something to make the quilt top a little bigger if it seems too small when I start to lay it all out.  Its really just a big work in progress right now!!


Finally this is a picture of my written down ramblings...!!  I've got a ton of these little sheets of paper with my scribbles down for measurements, ideas, designs....anything like that.  Maybe I should invest in a little note book or something?!

Hopefully I can slowly start on the cutting tomorrow and see how it might fit together with the fabric that I have.  Who knows, I might have one or two other fabrics that might fit in that I have hanging around in my stash and if not a shopping I will go!!

Wednesday, May 25, 2011

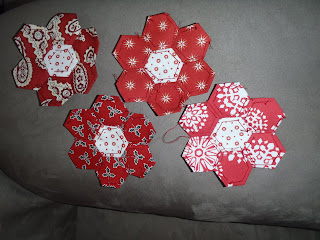
One (Actually Two) Flower Wednesday!

Today marks another week of One Flower Wednesday.  I was a bit of a keener this week and pegged off two!   Sorry for not ironing them and the pictures aren't great - I was trying to avoid getting my almost 2 year old in the pictures who was trying to 'help' me!

The snowflake flower, I need to trim the ends...


My star flower - its pretty cute....


The garden so far...!!!  The more I look at them I'm pretty sure that I'm going to edge each of them with the same white and red centre fabric to keep the reds from mixing together and keeping more definition between the flowers.


I'm not sure why my flowers are curling so much but I'm hoping once I iron them they should lay flat.

I do have a quick question for my fellow gardeners:  I always double my thread up when I'm sewing the 'petals' together - is this the best way to do it or should I just use a single strand of thread to sew the petals together?   Thanks!!

Monday, May 23, 2011

Not so funky Crochet...!

Well I'm still not sure if I'm inventing stitches or not (haven't gotten around to YouTubing some videos on basic stitches yet) but in my incredibly humble opinion they are looking better than they were a few weeks ago!!!

One day I hope to make an afghan that looks like this:


There is something super cute and homey about a Granny Square afghan - I love them!!  Its the type of thing that I want to snuggle up in on my couch with a big bag of chips and a cold bottle of coke and watch a movie on a cold winters night.  Maybe one day I'll be able to work up to something like that but until then I'll settle for attempting straight lines and trying not to drop stitches!!  

I'll toot my my own horn and say that I think that I did ok on my single crochet that I tried the other day:


This however is the unknown stitch that I attempted:


Its not bad, I quite like it but I always seem to manage to twist the yarn when I am turning the square so I don't always end the row the right way.


I think it would actually make a pretty good scrubby dishcloth but I've already torn it out in anticipation for the next time crochet inspiration strikes.  Hopefully I'll peruse YouTube before then so I actually do 'real' stitches that I can learn with and maybe just maybe one day make a real granny square afghan until then its boring 'ol stitches while I learn for me!

Friday, May 20, 2011

Friday Night Sew In - Summer Wall Hanging Progress

What do I do on a Friday night - I sew whilst my husband is out with his brother and Dad at a Movie (that I really wanted to see...but oh well, pity party is over - we can rent it when it comes out, I was really bummed that I missed out on the movie theatre popcorn!) and attempt to make some progress on my Summer Wall Hanging.

I'm having mixed feelings about this one so far.....its cute, but I'm not sure if its big enough, if Its got enough contrast, how I'm going to finish the top, what boarders I should do....and the list goes on!  I think it needs to get put away for a little bit and then I can ponder (or maybe make one more row of pinwheels and solid blocks?!?!)  what to do with it after I've had a few days away from it.

I started the day with these made:


Then I cut my solid squares, squared them all up and started to assemble them into the quilt top.


The finished top, I like it but I still feel like its missing something....not sure what but I'm just not 100% happy with it.


I was trying to figure out what boarder to use, the white is a nice contrast but the red is nice and bold - but there is no definition between the quilt top and the boarder.


I think I like the white boarder with red binding - that way they both stand out and there is still that awesome pop of color.  Still - something is off....


AHA!  Its amazing what happens when you are trying to clean up and write a blog post at the same time - INSPIRATION!!  I found two extra pinwheels hiding under my cutting mat and I realized if I took the two pinwheels and three solid squares I had enough for one more row....and I think it was exactly what the quilt top needed!!


If I couple that with the white boarder (still not sure how big that is going to be - maybe 1/2 the width of  a row?)  and then do the red binding it will be pretty cute.

Its not going to be very big (how big does it have to be to be classified as a 'wall hanging' and not a really big placemat?!!?!) but I think it will be something like 20x24 inches which seems to be a pretty good size.

Its amazing how I can go from not really digging this quilt at the beginning of this post and before I started cleaning up to quite liking it 30 minutes later.  Its funny how a combination of being over tired and cleaning can clear things up!

Now its time to finish cleaning up and maybe I'll attack this quilt tomorrow or maybe I'll give the Crazy Cat Quilt some love since its been neglected for a few weeks after some serious progress!

Thursday, May 19, 2011

The Happy Summer Wall Hanging

So I managed to make a little bit of progress with the Happy Summer Wall Hanging yesterday - its still a work in progress since I've changed the design three or four times already and I'm sure I will a few more times before I finally finish it.

Originally I thought it would be cute to just do random traingle-squares and have a central square pattern to anchor the wall hanging together but the more I used the Accuquilt to cut my triangles the more I realized that I could make some cute pinwheels so I could have some sort of a pattern to make the piece  a little more cohesive.


I only managed to get four of the ten pinwheels put together before I got frustrated from sewing the wrong squares together and needed to put it away before I got angry and did some damage with my seam ripper!

I'm still not sure how big its going to be or what other twists and turns it might take over the period of time it takes for me to finish it - until then its just cute and all the bright colors are making me pretty happy on this gloomy Thursday!!

Wednesday, May 18, 2011

One Flower Wednesday!

Week 2 of One Flower Wednesday complete!  

I picked the holly fabric last night to work on my second flower - its just so Christmassy it makes me happy!!  


The two flowers:


They are pretty cute - two down about a zillion to go!!!  

Tuesday, May 17, 2011

Burp Cloth Complete!

I found a post a while back regarding how to make a Chenille Baby Blanket on the Aesthetic Nest Sewing Blog (still can't figure out the link button - sorry!!) and attempted to make one a few weeks ago.  I made a burp cloth in the same fashion the other day and will post the tutorial on how I did it in the next few days.

Until then here are a few pictures to peak your interest!


I'm hoping to have the tutorial up and going in a few days.

Sunday, May 15, 2011

A Happy Summer Wall Hanging

After rummaging through my scrap bin last night trying to figure out what I can make without running to the store (which I can't do!) to grab either some elastic for a skirt, background fabric for a few quilts I'd like to start, buttons for embellishments...... the list could go on.  I stumbled across my leftover Oh Cherry Oh Jelly Roll fabric and had a lightbulb moment!  I realized that if I put a strip of the jelly roll on my Accuquilt Go triangle die it just fits and I don't have any extra cutting to do!  Pure Awesomeness!

I think I'm going to attempt to make a little summer wall hanging using a Ohio Star-type design but for the most part I'm just going to wing it and see how it goes!  ;)  Probably not the best course of action but I'm feeling a little rebellious lately and I am going to attempt a few things that I've never tried before on this little wall hanging to mix things up!

There are 14 different fabrics that I will be mixing up to make different squares - super cute fabrics!!


The red flower fabric on the right is going to be the 'filler' between the triangle-squares.


Time to get sewing before the girlies get home from Grandmas house in an hour or so!!

Friday, May 13, 2011

One Flower Wednesday!

I've decided to give english paper piecing a go again - mostly because I can't do the major cutting involved with the big projects too often - so now I have a Christmas 'Grandmas Flower Garden' started!!


I have 6 fabrics that I am going to use for the 'petals' (one fabric for each flower) and the cream and red print is the centre of each flower.  I'm debating on ringing the outside of each 'flower' with a cream print to make each red flower stand out but I can cross that bridge when I get the majority of the flowers put together.


I have no idea where I am going to put my little wall hanging (or even how to finish a paper pieced project) but I figure I have a LOT of time before I'm anywhere near finishing the project so I'll worry about that later!  Until then its just nice to have something to keep my hands busy and keep me out of trouble!

Crazy Cat Quilt - Progress Made!!

I am loathe to admit it but here it goes: I screwed up - and I have been avoiding the Crazy Cat Quilt for MONTHS trying to figure out how to 'fix' my little screw up.   I cut off about a 1/4 inch too much off each cat panel and in turn I needed to figure out how to cut down each and every piece of fabric for the quilt by that much without making the squares on the patchwork pieces look too small on the ends.  Finally after a few days of taking some measurements, laying a few pieces out on the table, measuring some more followed up by a little praying I took a deep breath and tried to square up the first patchwork piece hoping I that I didn't screw it up AGAIN!  It took a few trims to get it to the right size but I would much rather cut not enough off a few times rather than cutting too much off (which got me in this mess in the first place!!) but I finally got it!!

I managed to get the first two columns done before my head started to hurt way too much but I am totally loving the way its turning out.  You can't really tell that the boarders around the cat panels are going to be smaller than they should be - then again I bet if I never mentioned it you never would have known!!


I took the picture below in the fall when I was first working on this blanket, sorry its sideways!!  Just do the head-tilt thing and enjoy the sideways quilt'ness!  ;)

(Disclaimer so I don't get yelled at tonight or tomorrow by those who love me and might be reading this: I wasn't crawling around on the floor getting up and down to lay all the fabric out and then standing on the couch to take the picture TODAY I promise!  I bent down twice to lay out the two strips in the first picture this evening and thats all.... I have been a good girl and have taken it easy this evening!!!)  


I think this is going to be a super awesome quilt when its done.  I still have no idea how I'm going to finish it I think I might just do the 'stitch in the ditch' technique and call it a day.  Its pretty busy so doing too much to the top might take away from all the cute cats!   I don't have backing fabric for this quilt yet but I can probably do some shopping for it once the top is all finished in a little bit
This was supposed to be a house warming gift for my Mom and her Husband when they moved into their new house in July last year.....I think it might be a 'Happy 1 year of being in your new house' gift.....!  Hey, better late than never right?  


Tuesday, May 10, 2011

My little Crafter in Training

I was working on my {horrible} crochet skills tonight in an attempt to get better and wound up having my almost 4 year old desperately trying to help me (which just lead to serious yarn tension issues) then it got me thinking that maybe there was something that she could do with yarn that wouldn't tick her off too much......enter the Knifty Knitter!!!  I've had this thing in my basement crafting tower for years and never really used it much.  We did a quick watch of a knifty knitter tutorial on YouTube so I could attempt to remember how the darn thing worked and then Miss S used the hook to loop the loops on the loom!  It was fantastic!  

She was pretty proud of herself - we got four or five rows done before she decided she was done (and I was surprised she lasted that long!)


She did the hooking and I did the looping.....such concentration!!!


Trying to figure out the easiest way to use the hook.


Her finished product for the evening!!


I'll keep it out to see if its something that she will want to try again with in the next few days or weeks and if not we can always put it away and do it again when she's a little bigger.  


Monday, May 9, 2011

Epic FAIL!!

I have a confession, I am a crocheter wanna be....I've tried and tried and for some reason I just can't do the fine art of Crochet!  My SIL has tried to teach me multiple times but I tend to mess the tension up, drop stitches or invent new stitches....!  Its really impressive to screw up on something that bad while trying numerous times to get the hang of it.

After an evening of watching a few episodes of our current TV show on DVD series this is what I wound up with.....


Pretty sad thats what I got accomplished in like 3 hours - but in my defence the Wraith were bombarding Atlantis and I had to pay attention to the shows we were watching!  After a while I noticed that the few rows that I had been working on didn't look 'quite right' and figured I should attempt something new (I should have consulted youtube for some crochet tutorials but why do that when I can wing it instead?!?!) so I did some hook-loop-yarn through the loop-and repeat type thing and wound up with the stitches at the top of the rectangle.


Apparently the 'hook-loop-yarn through the loop-and repeat type thing' is an actual stitch!!!  My SIL verified that I had indeed did a real crochet stitch!


So I got a good start under my belt with my sad little rectangle that I promptly ripped apart after I took pictures of it because I had to destroy any hard physical evidence of my bad crocheting skills.  Time to keep practicing and maybe, just maybe I'll be able to make something somewhat worthwhile eventually! ;)

Saturday, May 7, 2011

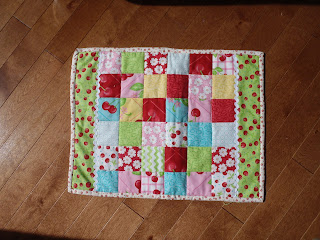
Placemats Done!!

Yes, I realize that its May but I finally finished my Christmas present for my MIL last week (hey, better late than never eh?!?!).  I had given her four out of the six placemats that I had made for Christmas but my poor fingers protested sewing the binding on two more placemats for a while.  Unfortunately my little break turned into a few - ok 4 month hiatus - BUT I did manage to finish the last two placemats over the last week while my MIL has been staying with me when my wonderful husband is working.

I found a tutorial for these placemats at A Quilting Life (Here), I can't figure out how to link the actual page to mine.  Sorry!  

I can't believe how much I LOVE these placemats....!!  They came out really well.  I used the Moda Oh Cherry Oh fabric for the patchwork and I'm not sure what I wound up using for the backing and binding but its super cute.


The backing!  The fantastic thing is you can use these place mats either side up depending on how busy you want your table to be.


Yet another thing off the WIP list and does it ever feel awesome!!  I've got a few more WIPs that I need to work on if I'm feeling ok, hopefully I can attack the Crazy Cat Quilt in stages and get that out the door before my Mom and her Husbands 1 year anniversary of being in their new house comes up in a few months!  


Tuesday, May 3, 2011

My Husband Rocks!!!

For the past few months (ok more like 7-8) I have been drooling over the Accuquilt GO fabric cutter and everything it can do. I tried to convince myself that I just needed the small one - the GO Baby - but after looking at them and researching and figuring out what kinds of projects I like to do I finally had to admit that the little one wouldn't work in the long run for me.  There are quite a few Dies that I want to try that I can't use at all on the little one.

My husband and I went out to look at it the other week but I just couldn't pull the trigger on it because of the cost. Its not a cheap but its soooo very cool!  Now that I have been put on rest by my doctor I just can't do the same rotary cutting that I was able to do before without getting cramps in my lower back and stomach and we want to say away from those as much as possible!!  


Last night my husband came home from work and surprised me with the GO - its sooo awesome. I wasn't able to play with it too much last night but thats my plan for today! I'm so excited! I have some leftover flannel that I want to try to make a tumbler quilt out of. I think its going to take a while but I can't wait - its going to be fantastic!!

Here it is in all its glory...!!!


The sides come down and you roll the Dies (template cutters) through the middle thingy.


Some of the Tumbler pieces I cut out - I have an idea for a cute flannel blanket for a super cute little birthday girl in the fall....


I was playing with the tumbler pattern last night and found some cute monster fabric to cut up - I LOVE the tumblers...!  


The Die that came with the Accuquilt is the Value Die and it does triangles and two different sizes of squares - no more hand doing triangles for me!!  Love it!


I forsee a super cute blanket with lots of piecing involved...(and no I didn't cut all the fabric today - it was a combination of last night and today!!!


Now if only I could sit down and cut and roll all my fabric through my Accuquilt all day, but alas I need to take it easy but at least I have something I can work on little by little over the next few months and years!  

Thanks again sweetie!  

Sunday, May 1, 2011

INSPIRATION!!!

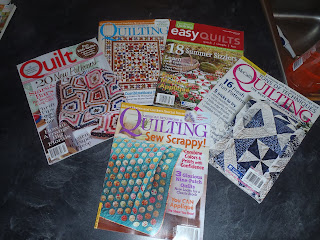
I have been put 1 step below complete bedrest by my doctor and my super awesome SIL brought over a basket overflowing with goodies to keep me occupied on the couch (and well fed in junk food!!) and a ton of new quilting magazines to keep me in the creative mood:


I REALLY want to try to make this wall hanging (sorry its sideways - still trying to figure out the whole picture importing thing) but I need to seriously hit an online fabric store and order some fabric that would work with this kind of pattern.  I don't think my hodgepodge of kiddy flannel, monster, bug, flower, and Christmas fabric would work well together with a wall hanging like this!!  Methinks some serious shopping needs to be undertaken over the next few weeks......bring it on.


I've got some good reading material, some serious time on my hands and a not totally maxed out credit card on my hands - who knows what will be created over the next 16 weeks!!!  ;)
Related Posts Plugin for WordPress, Blogger...